
Before and after photographs are the most widely used form of evidence in hair restoration marketing, and among the most frequently misread. A patient who knows how to evaluate a set of before and after photos is in a substantially better position than one who accepts them at face value. The difference is not a matter of cynicism : most clinics believe their photographs represent genuine results : but of understanding what the photographs actually show, what they do not show, and what questions they leave unanswered.
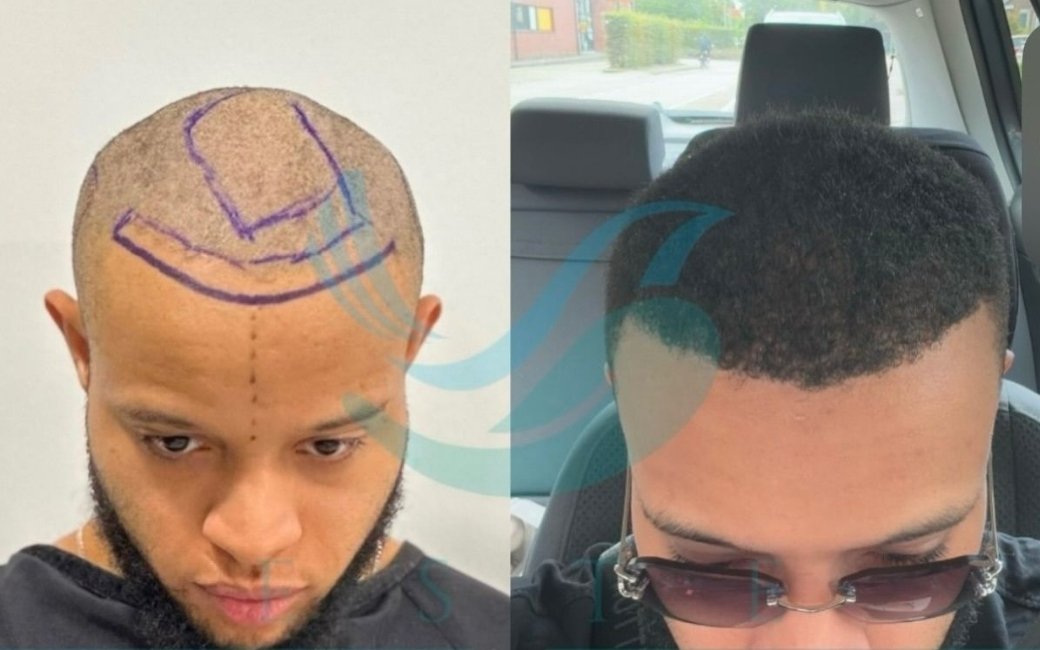
This article explains what to look for and what to be sceptical of when reviewing hair transplant before and after photographs. It covers the most common photographic variables that affect how a result appears, the timing considerations that separate genuine twelve-month results from optimistic six-month impressions, the styling and grooming factors that can make a result look better or worse than it actually is, what a genuine high-quality result should look like, and how to use photographs as part of a broader evaluation rather than as a standalone verdict.
The Timing Problem: When Were These Photos Taken?
The single most important variable in a before and after photograph is when the after photograph was taken. Hair transplant results develop over twelve months, and the appearance of the result changes substantially across that period. A photograph taken at four months captures a result in the early regrowth phase: some grafts are producing fine, short hairs, the density appears lower than it will at full growth, and the overall impression is of a result in progress rather than a completed outcome. A photograph taken at six months shows a more developed result, but still one in which the final calibre of the hair shaft has not been reached. The photograph that represents the genuine final result is taken at twelve months.
Clinics that photograph results at six months and present them as representative outcomes are not necessarily being dishonest : they may genuinely believe the result looks good and want to document it : but they are presenting a result before it is complete. The density apparent at six months will improve further. The integration of transplanted hair with native hair settles. The hair shaft calibre increases. The twelve-month photograph of the same patient will typically look better than the six-month photograph, sometimes significantly so.

When reviewing a clinic’s portfolio, ask explicitly: when were these photographs taken? A clinic that cannot specify, or that answers with a range that includes early post-operative photographs, is not providing the level of documentation that allows a genuine assessment of its standard results. The appropriate benchmark is twelve months minimum, with the understanding that some patients take up to eighteen months for the final result to fully mature.
The before photograph timing also matters, though it is less frequently discussed. A before photograph taken under harsh overhead lighting that emphasises thinning will produce a more dramatic apparent improvement than a before photograph taken with flattering lighting. The most informative before photographs are taken under the same lighting conditions as the after photographs, which allows a genuine comparison rather than a comparison between an unflattering before and a flattering after.
Lighting: The Most Controllable Variable
Lighting has a greater effect on the apparent density of hair than any other photographic variable. Hair looks denser in diffuse, even light and sparser in direct overhead light that creates shadows between individual hair shafts. A result photographed under studio lighting with soft diffusers will appear significantly denser than the same result photographed under harsh direct flash. Neither photograph is technically dishonest : both show the actual hair : but they represent the result in very different ways.
The overhead lighting effect is worth understanding specifically. When light comes directly from above, it strikes the top of each hair shaft and creates shadows in the gaps between shafts. This makes individual hair spacing visible and reduces the apparent density dramatically, even in a full head of hair. This is why the same person can look almost completely bald in certain overhead lighting and apparently full-haired in diffuse studio lighting. A before photograph taken under harsh overhead lighting combined with an after photograph taken in flattering soft light is one of the most common sources of misleading impressions in hair transplant marketing.

What to look for: compare the lighting conditions in the before and after photographs. If the before is taken with harsh flash or overhead fluorescent lighting and the after is taken with soft studio lighting, the comparison is not fair. A genuine comparison uses consistent lighting across both photographs. When you notice that the after photograph has softer, more flattering lighting than the before, apply proportionally more scepticism to the apparent improvement.
Good practice in clinical photography uses a standardised protocol: the same camera, the same distance, the same lighting conditions, and the same head position for both before and after photographs. A clinic that follows this protocol produces photographs that allow genuine comparison. A clinic whose photographs vary in lighting, angle, and distance between before and after is either not following a standardised protocol or is allowing aesthetic judgment to influence which settings are used for which photographs.
A practical test you can perform when reviewing photographs is to check whether you can see the scalp clearly in the after photographs. Under soft, flattering studio lighting, even moderate density transplanted hair will cover the scalp completely. Under the same clinical overhead lighting that produced the unflattering before photograph, the same result would show more visible scalp. If the after photographs never show any scalp visibility, even in areas of documented moderate density, the lighting has likely been chosen specifically to maximise the visual impression of density.
Camera Angle and Head Position
The angle from which a hair transplant result is photographed affects the apparent density almost as significantly as lighting. A slightly downward camera angle photographs the top of the head from above, showing the part line and the density distribution across the crown. A slightly upward camera angle photographs the hairline from below, emphasising the hairline density while reducing the visibility of the mid-scalp and crown. A straight-on eye-level photograph shows the hairline in its most natural perspective.

Head position adds another variable. A photograph taken with the head tilted slightly forward brings the crown into view and can make crown thinning more or less visible depending on the tilt. A photograph with the head tilted slightly back shows the frontal hairline more dramatically. A consistent standard position : typically defined as Frankfurt horizontal, with the eye-ear plane horizontal : eliminates head position as a variable and allows the density and hairline quality to be assessed fairly.
When reviewing before and after photographs, check whether the head position and camera angle are consistent. If the before photograph is taken from slightly above with the head tilted forward and the after photograph is taken at eye level with the head in a neutral position, the comparison is affected by more than just the transplanted hair. Inconsistency in angle does not necessarily indicate manipulation, but it does indicate an absence of the standardised photographic protocol that produces reliable comparisons.
Styling, Grooming and Hair Characteristics
How the hair is styled in before and after photographs affects the apparent result profoundly. In before photographs, hair is often shown wet, uncombed, or in a style that maximises the visibility of thinning. In after photographs, the same patient’s hair is styled in a way that maximises coverage: the hair is dry and styled forward or sideways to camouflage the density in the treated area, or is slightly longer in the after photograph, which creates additional coverage through length.
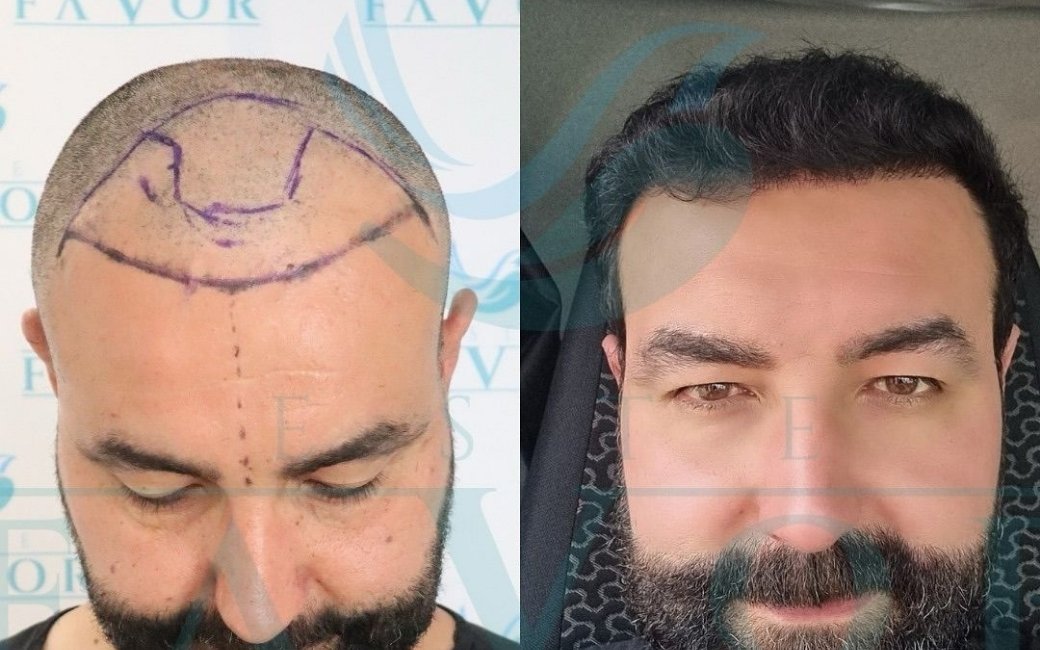
Hair length deserves specific attention. Transplanted hair looks denser as it grows longer, because longer hair shafts fan out and overlap each other to create more complete coverage of the underlying scalp. A before photograph showing short or shaved hair and an after photograph showing the hair grown to three or four centimetres will show a density difference that partly reflects transplanted growth but partly reflects the change in hair length. The most informative comparison keeps hair length consistent, or shows both short and long hair in the after photographs.
Product use is a more subtle styling variable. Hair building fibres, thickening sprays, and matt paste can all increase the apparent density of a result without affecting the actual follicle count. These products are not illegitimate : patients use them regularly in their daily lives : but in a clinical before and after photograph they introduce a variable that should be controlled. A comparison between a before photograph showing bare, unstyled hair and an after photograph showing styled, product-enhanced hair is not a fair assessment of the graft result alone.
Hair characteristics also interact with the result in ways that photography may not capture accurately. Coarse, dark hair on a fair scalp provides more visual coverage per graft than fine, fair hair on a fair scalp. A result that looks dense in photographs may look less so in everyday life if the hair is very fine and light, and a result that looks moderate in photographs may provide excellent coverage in person if the hair is coarse and dark. Understanding this means that photographs of other patients are most informative when the comparison patient has similar hair characteristics to your own.
The direction in which the hair is combed in the after photographs also carries information. A hairstyle that combs all hair forward from the crown toward the hairline maximises the coverage of the frontal zone by using hair from all parts of the top of the scalp to cover the front. This is a legitimate and common styling choice in real life, but in a before and after photograph it makes it difficult to assess the density distribution across the individual zones because everything is obscured under the forward-combed coverage. A fair documentation photograph shows the hair in a natural resting position.

What a Genuine High-Quality Result Looks Like
Understanding what to be sceptical of makes it easier to recognise what genuine quality looks like. A twelve-month result photographed under consistent, standardised lighting in a neutral head position will show the hairline, the density distribution, and the integration with native hair accurately. Here is what a genuine high-quality result demonstrates.
The hairline transition zone should be soft and irregular. At the leading edge of a well-executed hairline, individual single-hair grafts create a slightly irregular, graduated boundary rather than a defined line. The hairs at the very front should be finer and lighter than those immediately behind, because single-hair follicular units were used at the frontier. If the before and after photographs show a hairline with a hard, straight, or completely uniform leading edge in the after photograph, this indicates implantation of multi-hair units at the hairline, which produces an artificial appearance.
The density in the transplanted zone should appear consistent and natural for the coverage goal that was stated. A frontal zone restoration should show even distribution across the treated area without patches of high density adjacent to patches of low density. Visible uneven distribution in the after photograph is either evidence of uneven graft survival, which can occur from technical issues during the procedure, or evidence of poor implantation planning.

The integration of the transplanted area with the native hair should be smooth. The boundary between where the transplanted hair ends and the native hair begins should not be obvious. If the after photograph shows a visible transition line between denser transplanted hair and sparser native hair, this indicates that the graft placement was not designed to account for the surrounding native hair or that the surrounding native hair has continued to thin since the procedure.
The donor zone is rarely photographed in before and after portfolios, but it is worth asking to see it. A donor zone that has been harvested responsibly, with extraction distributed across the available area at an appropriate density, will show no visible thinning in after photographs. A donor zone that was over-harvested, or where extraction was concentrated in a small area, will show visible reduction in density in the after photograph. This is particularly important when evaluating clinics for a second hair transplant procedure, but it is also relevant as a general quality indicator for any procedure.
Finding Comparable Cases
The most useful before and after photographs are those of patients whose starting point and goals are similar to your own. A collection of impressive results from Norwood 2 patients tells you very little about what to expect if you present with Norwood 4. Results from patients with coarse, dark hair are not directly predictive of results in patients with fine, fair hair. Results from patients who received 3,500 grafts for a specific coverage goal are not comparable to your situation if you require 1,800 grafts for a different goal.

When requesting comparable cases from a clinic, be specific: your Norwood stage, your hair characteristics, your approximate graft requirement, and your primary coverage priority. A clinic that can produce three to five comparable twelve-month cases for patients matching your profile is demonstrating both the breadth of its clinical experience and the quality of its documentation practices. A clinic that can only show you its best showcase results, or that shows you results from patients with noticeably better starting characteristics than yours, is providing less useful evidence.’,
Pay attention to what the comparable cases look like at the starting point. Before photographs that show severe, diffuse, or obviously advanced loss, combined with after photographs showing good density, are less reassuring than results from patients whose before photographs show a starting point similar to yours. The former may represent exceptional results in difficult cases; the latter tells you directly what to expect for your own situation.
The timeline of the cases in the portfolio is worth noting. A clinic that opened five years ago and has an extensive portfolio from its entire operating history is providing more information than a clinic that has been open for three years but shows only results from the past eighteen months. A clinic whose portfolio includes both older and more recent results, showing consistency of quality over time, is demonstrating something meaningful about the reliability of its outcomes. If all results in the portfolio appear to be from the same short period, ask why.
Red Flags in Before and After Portfolios
Several specific features in a before and after portfolio should prompt additional scrutiny. A portfolio where all results are photographed from the same angle and under the same lighting suggests either that the clinic has a standardised protocol, which is positive, or that the portfolio is curated to show only the most flattering perspective, which warrants investigation. Ask to see photographs from multiple angles for the same patient.

A portfolio where all patients have similarly textured, dark hair should prompt questions about whether the clinic photographs a representative sample of its patients or selects for cases where the result photographs particularly well. Fine, light hair on a light scalp produces results that are harder to photograph impressively than coarse, dark hair. A portfolio lacking any fine-haired patients may not be representative.
Inconsistent before and after photograph quality : where before photographs appear to be low-resolution phone photographs and after photographs are high-resolution professional images : indicates a documentation approach where the before is treated as unimportant and the after is treated as the product to be marketed. A consistent clinical protocol treats both equally.
Photographs labelled as results at three or six months presented as evidence of the final result are a straightforward indicator of either poor understanding of the growth timeline or deliberate optimism. If the clinic cannot easily produce twelve-month photographs for patients who had their procedure more than twelve months ago, that absence is meaningful.

Using Photographs as One Input Among Several
Before and after photographs are useful evidence when read critically, and almost meaningless when read uncritically. The patient who looks at a before and after portfolio and takes the impression at face value is making a decision based on marketing. The patient who looks at the same portfolio and asks when the photographs were taken, whether the lighting and angle are consistent, whether the hair length and styling are comparable, and whether the cases shown are genuinely similar to their own situation, is extracting information that is actually useful for evaluation.
Photographs should be one input among several in the clinic evaluation process: alongside the answers to the pre-booking questions, the assessment of the clinic’s pre-operative protocols, and the quality of the consultation conversation itself. A clinic with an impressive photograph portfolio but a consultation that avoids the specific planning questions is not demonstrating the same quality throughout its process. And a clinic whose photographs are modest but whose consultation is thorough, whose documentation is complete, and whose pre-operative assessment is rigorous, may well produce better outcomes than the clinic with the better photographs.
